
The Ultimate Guide to Milk Bread: 7 Expert Tips for a Soft and Fluffy Loaf
Craving a soft, pillowy loaf? This guide reveals 7 expert secrets for baking irresistibly fluffy milk bread. Unlock the magic today!
Table of Contents
The Ultimate Guide to Milk Bread: 7 Expert Tips for a Soft and Fluffy Loaf
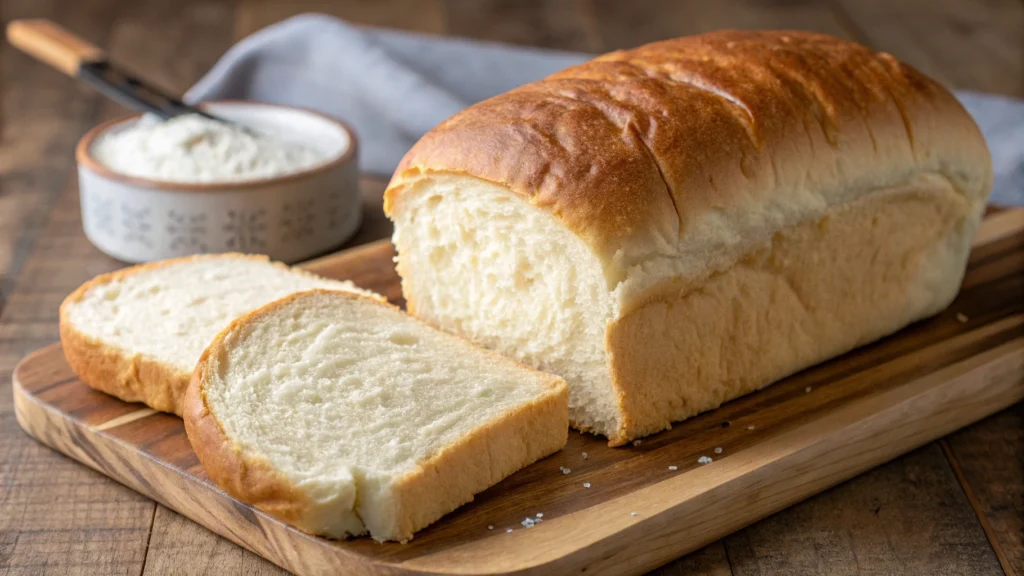
Milk bread. Just the name conjures images of the softest, fluffiest bread imaginable. Imagine tearing into a loaf, the delicate, slightly sweet aroma filling the air as you pull apart each incredibly soft piece. This is the magic of milk bread, and it’s now within your reach. This article is your guide to mastering this delightful bread.
What is Milk Bread?
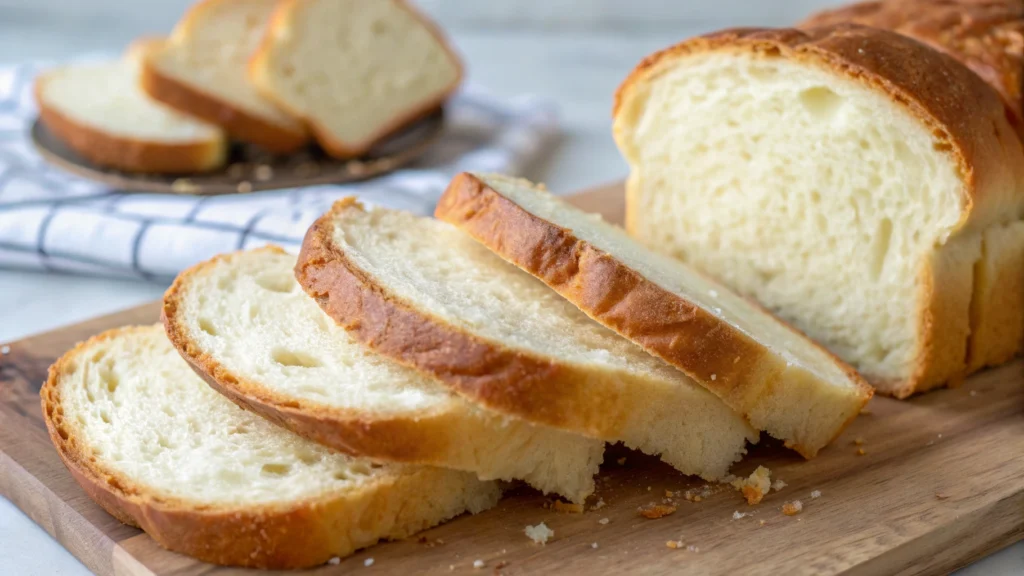
Milk bread, often associated with Japanese baking, is celebrated for its uniquely soft and tender crumb. Though techniques vary across Asia, its defining characteristic remains: an incredibly light and airy texture. For example, its growing popularity in the U.S. is due to this amazing texture, as well as its slight sweetness.
Origin and History
While numerous cultures have bread enriched with milk, the distinctive qualities of milk bread, as we know it, often trace back to Japanese shokupan. Indeed, Japanese baking techniques like tangzhong or yudane are fundamental to achieving its signature texture. It’s therefore no surprise that these methods have been widely adopted.
Unique Characteristics
The defining characteristics of milk bread are a soft crumb, delicate crust, and slight sweetness. In addition to these traits, the “pull-apart” texture is a hallmark of well-made milk bread. For example, the ability to easily tear off fluffy sections is what makes it so irresistible.
Milk Bread Variations
While the core concept remains the same, variations exist. Hokkaido milk bread, for instance, often uses Hokkaido milk powder for added richness. Pain de Mie, a French analogue, is similarly soft and crustless. However, these slight differences in technique ultimately impact the final product’s texture and flavor.
The Science Behind Softness: Milk Bread Magic
The secret to incredibly soft milk bread lies in a combination of scientific principles. These principles all revolve around gluten development and moisture retention. Therefore, understanding them is crucial for consistent results.
Gluten Development in Milk Bread Baking
Gluten, a protein formed when flour is hydrated, provides the structure for bread. However, too much gluten development can lead to a tough loaf. In addition to that, milk and fat play a vital role in softening the gluten.
Tangzhong and Yudane: Secret Weapons
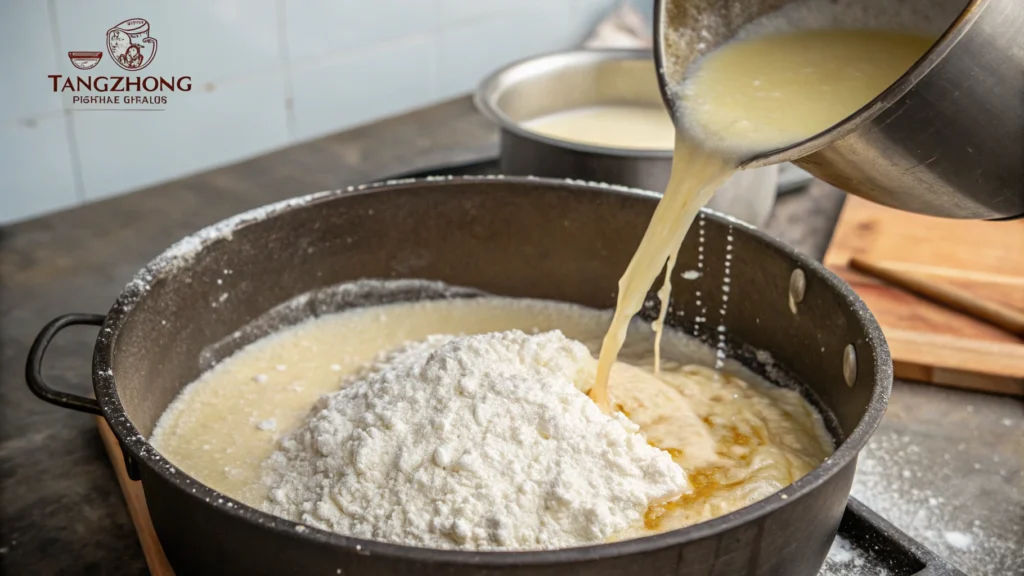
Tangzhong (cooked flour paste) and Yudane (scalded flour) are Japanese baking techniques used to pre-gelatinize the starches in flour. Because of this pre-gelatinization, the flour absorbs more water, resulting in a softer crumb and longer shelf life. For instance, the tangzhong method involves cooking a portion of the flour and liquid (usually water or milk) into a thick paste before adding it to the rest of the ingredients. The Yudane method is another way to achieve the same end.
Role of Milk and Fat
Milk, especially whole milk, contributes richness and tenderness. Furthermore, the fat in milk interferes with gluten development, creating a more delicate structure. For example, using skim milk will not provide the same results as whole milk.
The Importance of Hydration
Milk bread dough typically has a higher hydration level than many other bread doughs. Because of this, the increased water content contributes significantly to its soft texture. Therefore, it’s essential to use the correct ratio of liquid to flour.
Essential Ingredients for Milk Bread
The quality of your ingredients significantly impacts the final product. Therefore, using the best possible ingredients will always yield better results.
Flour for the Fluffiest Loaf
Bread flour, with its higher protein content, is generally recommended. In addition to bread flour, high-protein all-purpose flour can also be used. Because protein content is essential for gluten development, using the right flour is vital.
Milk: Choosing the Right Kind
Whole milk adds richness and moisture. Furthermore, you can also use milk alternatives, such as oat or almond milk, though they may affect the final texture and flavor. In addition to this, the fat content of the milk significantly impacts the bread’s tenderness.
Sugar: Adding Sweetness and Life
Sugar not only provides sweetness but also feeds the yeast. For instance, granulated sugar, caster sugar, or even honey can be used. Furthermore, sugar helps with browning.
Yeast: The Leavening Agent
Active dry, instant, or fresh yeast can be used. However, it’s essential to activate the yeast properly, especially active dry yeast, before adding it to the other ingredients. In addition to that, proper storage of yeast is also critical for its effectiveness.
Butter: Richness and Flavor
Good quality butter enhances both flavor and tenderness. Furthermore, unsalted butter allows you to control the salt content of the recipe more precisely. However, salted butter can be used.
Eggs: Structure and Moisture
Eggs add richness, moisture, and structure to the dough. For instance, they help create a more stable crumb. Therefore, eggs are essential for a good final product.
Expert Tip #1: Master the Tangzhong or Yudane
The tangzhong or yudane method is the cornerstone of soft milk bread. By using one of these methods, you can achieve the incredible tenderness and moisture that is the hallmark of this bread.
Detailed Explanation of Tangzhong
To make tangzhong, whisk together 1 part flour (usually bread flour) and 5 parts liquid (water or milk) in a saucepan. Cook over medium heat, stirring constantly, until the mixture thickens into a pudding-like consistency (about 3-5 minutes). In addition, let the tangzhong cool before adding it to the other ingredients. Furthermore, if it’s too thick, add a little more liquid.
Detailed Explanation of Yudane
To make yudane, pour boiling water (about 70% of the flour weight) over the flour and mix until a shaggy dough forms. Cover and let it steep for at least 4 hours or overnight. Moreover, the yudane will become soft and pliable. Therefore, you should adjust the water slightly if the dough is too dry or wet.
Why this Step is Critical
Tangzhong and yudane pre-gelatinize starches, which allows the flour to absorb more water. This in turn results in a softer, more moist crumb and extends the bread’s shelf life. For example, bread made with tangzhong stays fresh for several days longer.
Tips for Incorporating Tangzhong/Yudane
Make sure the tangzhong is cooled before adding it to the other ingredients to avoid overheating the yeast. Furthermore, break the yudane into smaller pieces before incorporating it into the dough for even distribution. Therefore, it is important to incorporate both methods evenly.
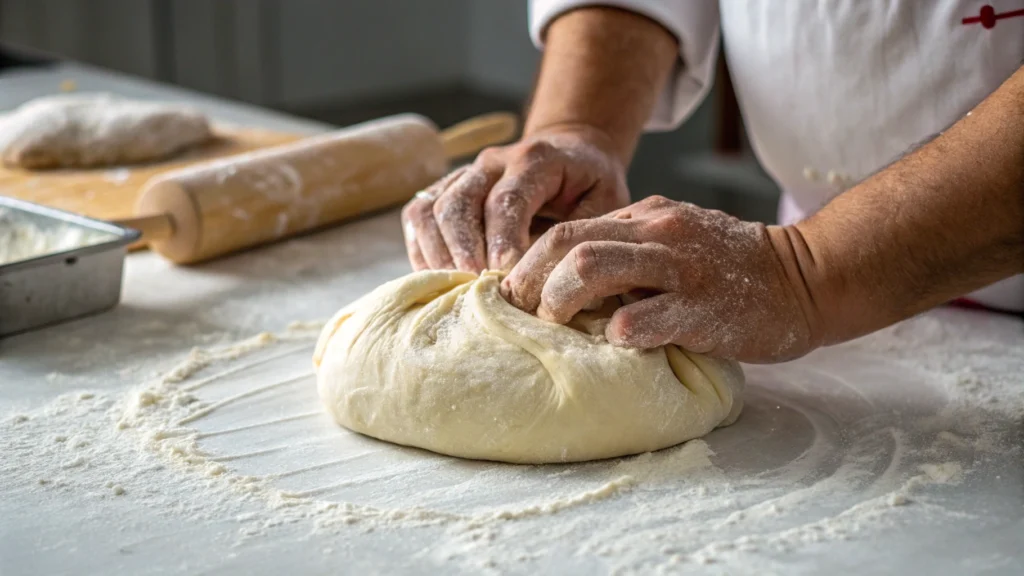
Expert Tip #2: The Right Kneading Technique
Proper kneading is essential for developing the gluten, which gives the bread its structure and elasticity. Without proper kneading, the bread will not be able to rise fully. However, over-kneading can also be detrimental.
Importance of Proper Kneading
Kneading develops the gluten, creating a network that traps air and gives the bread its characteristic texture. Because of the gluten structure, it is important to achieve proper kneading. Therefore, the bread won’t rise and have the desired texture without it.
Hand Kneading vs. Stand Mixer
For hand kneading, turn the dough out onto a lightly floured surface and knead for 10-15 minutes, using a push-turn-fold motion. Alternatively, use a stand mixer with a dough hook for 8-10 minutes on medium speed. For example, if the dough starts sticking to the bowl, add a little flour.
The Windowpane Test
The windowpane test is a way to determine if the dough has been kneaded enough. Stretch a small piece of dough between your fingers. If you can stretch it thin enough to see light through it without tearing, the dough is ready. Therefore, this test will let you know if the gluten has been developed.
Troubleshooting
If the dough is over-kneaded, it will become tough and difficult to stretch. In addition, if it is under-kneaded, it will be sticky and won’t hold its shape. Therefore, be vigilant during kneading.
Expert Tip #3: First Proofing: Patience is Key
The first proofing, or bulk fermentation, allows the yeast to work its magic, creating air pockets and developing flavor. Furthermore, this step is often underestimated.
Importance of the First Proof
During the first proof, the yeast consumes the sugars in the dough, producing carbon dioxide, which leavens the bread. In addition, this process also develops the bread’s complex flavors. Therefore, the first proof is essential for both texture and taste.
Ideal Conditions for Proofing
The ideal temperature for proofing is around 75-80°F (24-27°C). Therefore, you can create a warm environment by placing the dough in a slightly warmed oven or covering it with a damp towel. For instance, a warm kitchen also aids in the process.
Signs of Proper Proofing
The dough should double in size and feel light and airy. In addition, if you gently poke the dough, the indentation should slowly spring back. Furthermore, the dough should have a pleasant, slightly yeasty aroma.
Over-Proofing vs. Under-Proofing
Over-proofed dough will collapse and have a sour, unpleasant smell. Under-proofed dough will be dense and won’t rise properly during baking. Therefore, it’s important to monitor the dough closely during proofing.
Expert Tip #4: Shaping for Perfection
The way you shape the dough influences the final appearance and texture of the bread. Furthermore, even shaping ensures even baking.
Different Shaping Techniques
For a classic loaf, gently deflate the dough and shape it into a rectangle. Roll the rectangle tightly and place it in a greased loaf pan. For rolls, divide the dough into small portions and shape them into round or oval shapes. Therefore, let your creativity guide you.
Achieving Even Distribution of Gas
Gently degassing the dough before shaping helps to remove large air bubbles, resulting in a more even crumb. In addition to that, this also helps prevent large air pockets from forming during baking. Therefore, this ensures a consistent texture.
Preventing Tears and Seams
Ensure a smooth surface by pinching the seams tightly and tucking them underneath the loaf. Furthermore, avoid overworking the dough, as this can cause tears. In addition to that, a light touch is key.
Expert Tip #5: Second Proofing: Finding the Sweet Spot
The second proofing, after shaping, allows the dough to relax and rise further, resulting in a lighter, more airy loaf. In addition to that, this step is often shorter than the first proof.
Importance of the Second Proof
During the second proof, the dough rises to its final volume, which affects the bread’s oven spring. In addition to that, this ensures a light and airy texture. Therefore, the second proof is crucial.
Monitoring the Dough
The dough should almost double in size and feel very light. When gently poked, the indentation should slowly spring back. In addition to that, it should look puffy.
Ideal Conditions
Maintain a warm, humid environment, similar to the first proof. In addition to that, this helps the dough rise evenly. Therefore, consistent conditions are important.
Preventing Over-Proofing
Check the dough frequently to prevent over-proofing, which can lead to a collapsed loaf. In addition to that, over-proofed dough can be difficult to work with. Therefore, keep a close eye on it.
Expert Tip #6: Baking Techniques: Temperature and Time
Proper baking is crucial for achieving the perfect texture and color. Furthermore, the correct temperature ensures even cooking.
Oven Temperature
Bake milk bread at around 350°F (175°C). In addition to that, it is important to use an oven thermometer to ensure the temperature is accurate. Therefore, invest in an oven thermometer.
Baking Time
Bake for 30-35 minutes, or until the loaf is golden brown and the internal temperature reaches 200-210°F (93-99°C). In addition to that, check the bread frequently. Therefore, avoid over-baking.
Oven Spring
Oven spring is the rapid expansion of the dough during the first few minutes of baking. Furthermore, a well-proofed dough will exhibit excellent oven spring. In addition to that, this creates a light and airy texture.
Preventing Over-Browning
If the crust starts to brown too quickly, tent the loaf with foil. In addition to that, an egg wash can promote a glossy, golden-brown crust. Therefore, monitor the color of the crust.
Expert Tip #7: Cooling and Storage for Lasting Softness
Proper cooling and storage are essential for maintaining the bread’s soft texture. Furthermore, incorrect storage can lead to staleness.
Proper Cooling Techniques
Cool the bread completely on a wire rack before slicing. In addition to that, this allows excess moisture to escape. Therefore, avoid slicing warm bread.
Preventing Soggy Bottom
Elevating the bread on a wire rack prevents the bottom from becoming soggy. In addition to that, this allows air to circulate around the entire loaf. Therefore, allow proper air circulation.
Storage Methods
Store milk bread in an airtight container or plastic bag at room temperature. Furthermore, for longer storage, freeze the bread. In addition to that, properly stored bread will stay fresh longer.
Reheating Techniques
Reheat milk bread in a low oven or toaster oven to restore its soft texture. In addition to that, a light toasting can also revive the bread. Therefore, gentle reheating is best.
The Ultimate Milk Bread Recipe
Here’s a detailed recipe for making your own soft and fluffy milk bread:
Yields: 1 Loaf
Prep time: 30 minutes
Cook time: 30-35 minutes
Ingredients:
- For the Tangzhong:
- 1/3 cup (40g) bread flour
- 2/3 cup (160ml) whole milk
- For the Dough:
- 3 cups (380g) bread flour
- 1/4 cup (50g) granulated sugar
- 1 teaspoon (5g) salt
- 2 1/4 teaspoons (7g) active dry yeast or instant yeast
- 1/2 cup (120ml) whole milk, lukewarm
- 1 large egg, lightly beaten
- 4 tablespoons (57g) unsalted butter, softened
Instructions:
- Make the Tangzhong: In a small saucepan, whisk together the bread flour and milk until smooth. Cook over medium heat, stirring constantly, until the mixture thickens into a pudding-like consistency. This should take about 3-5 minutes. Remove from heat, transfer to a small bowl, and cover with plastic wrap, pressing the wrap directly onto the surface to prevent a skin from forming. Let cool completely.
- Activate the Yeast (if using active dry): In a small bowl, combine the lukewarm milk and yeast. Let sit for 5-10 minutes, or until foamy. If using instant yeast, you can skip this step and add it directly to the dry ingredients.
- Combine Dry Ingredients: In the bowl of a stand mixer fitted with the dough hook attachment, combine the bread flour, sugar, and salt.
- Add Wet Ingredients: Add the cooled Tangzhong, yeast mixture (or instant yeast), and beaten egg to the dry ingredients.
- Knead the Dough: Knead on low speed for 8 minutes, or until the dough comes together and forms a shaggy mass.
- Add Butter: Add the softened butter, a tablespoon at a time, kneading until each addition is fully incorporated before adding the next.
- Continue Kneading: Increase the speed to medium-low and continue kneading for another 8-10 minutes, or until the dough is smooth, elastic, and passes the windowpane test. It should be slightly tacky but not sticky.
- First Proof: Form the dough into a ball and place it in a lightly oiled bowl, turning to coat. Cover the bowl with plastic wrap or a damp cloth and let rise in a warm place for 1-1.5 hours, or until doubled in size.
- Shape the Dough: Gently punch down the dough to release the air. Turn it out onto a lightly floured surface and divide it into three equal portions. Roll each portion into a long rope and then roll each rope into a flat oval. Fold each oval into a loaf shape by bringing one end of the oval up to the center, and fold the other side until they join.
- Arrange the 3 pieces in the baking pan with the seam facing down. Cover and let rise for the second proof.
- Second Proof: Cover the shaped dough with plastic wrap or a damp cloth and let rise in a warm place for 45-60 minutes, or until it almost doubles in size and reaches the top of the pan.
- Preheat Oven: Preheat the oven to 350°F (175°C).
- Brush the top of the bread with eggwash.
- Bake: Bake for 30-35 minutes, or until the top is golden brown and the internal temperature reaches 200-210°F (93-99°C). If the top starts to brown too quickly, tent it with foil.
- Cool: Remove the loaf from the oven and let it cool in the pan for 10 minutes before transferring it to a wire rack to cool completely.
Nutritional Content (per 100g):
| Nutrient | Amount |
| Calories | 280 |
| Protein | 8g |
| Fat | 10g |
| Carbohydrates | 40g |
| Fiber | 1g |
| Sugar | 8g |
Troubleshooting Common Milk Bread Problems
Even with the best intentions, problems can arise. Therefore, here’s a quick guide to troubleshooting common milk bread issues:
Dense Bread
Possible causes include not enough kneading, not enough proofing, or incorrect oven temperature. Therefore, ensure proper kneading and proofing times.
Dry Bread
Possible causes include over-baking, too much flour, or not enough hydration. Therefore, monitor baking time and adjust flour/liquid ratios.
Flat Bread
Possible causes include over-proofing or weak gluten development. Therefore, watch the proofing time and ensure proper kneading.
Tough Crust
Possible causes include baking at too high a temperature or not enough humidity in the oven. Therefore, reduce oven temperature or add a pan of water to the oven during baking.
Uneven Shape
Possible causes include uneven shaping or uneven oven temperature. Therefore, practice consistent shaping techniques and ensure an even oven temperature.
Serving Suggestions and Recipe Ideas
Milk bread is incredibly versatile and can be enjoyed in countless ways. Furthermore, its subtle sweetness makes it a perfect accompaniment to both sweet and savory dishes.
Serving Suggestions
Enjoy it toasted with butter and jam, use it for sandwiches, make French toast, or create a decadent bread pudding. In addition to that, it’s delicious on its own. Therefore, experiment with different serving options.
Recipe Variations
Use milk bread dough to make cinnamon rolls, sweet buns, or filled breads. In addition to that, you can add flavorings to the dough, such as citrus zest or spices. Therefore, let your imagination guide you.
Frequently Asked Questions About Baking Milk Bread
What is Japanese milk bread?
Japanese milk bread, or Shokupan, is known for its incredibly soft and fluffy texture, achieved through special techniques such as the Tangzhong method. It is a staple bread in Japan and is widely appreciated for its slight sweetness and delicate crumb.
Can you share a milk bread recipe?
A good milk bread recipe includes flour, milk, sugar, yeast, butter, and eggs. The key is in the technique, such as the Tangzhong or Yudane method, which helps to pre-gelatinize the starches and retain moisture.
Is it possible to make milk bread without an oven?
While traditional milk bread is oven-baked, there are some variations, which can be adapted for cooking in a rice cooker or steamer. However, the texture may vary compared to the baked version.
What can I make with milk bread buns?
Milk bread buns can be used for sliders, sweet buns, or enjoyed with savory fillings. They can also be brushed with butter and sprinkled with sesame seeds for added flavor and visual appeal.
What makes Hokkaido milk bread special?
Hokkaido milk bread is prized for its exceptionally soft texture and rich flavor, enhanced by Hokkaido milk powder or locally sourced milk. This gives the bread a unique and luxurious taste.
Is there a milk bread recipe that does not use eggs?
Yes, there are milk bread recipes that do not use eggs. These recipes typically rely on other ingredients to provide structure and moisture, such as the Tangzhong or Yudane method.
Where can I find a simple Japanese milk bread recipe?
Many reputable baking websites and cookbooks offer simple Japanese milk bread recipes. Look for recipes that provide clear instructions and visual guides for best results.
Is Korean bread similar to milk bread?
Yes, Korean bread can be similar to Japanese milk bread. Both are known for their soft and fluffy textures, and many Korean bakeries offer varieties that resemble Shokupan, often adapting techniques from Japanese baking.
Conclusion
With these 7 expert tips, you’re well on your way to baking the softest, fluffiest milk bread imaginable. Therefore, don’t be afraid to experiment and adjust the techniques to suit your preferences. Happy baking!
Please leave a comment below and share your experiences of baking milk bread!
Cooking is an act of love and creativity! 🌟 What do you think of this recipe? I’d love to hear your thoughts and any tips or tweaks you’d suggest to make it even better. Let’s inspire each other in the kitchen!
There are no reviews yet. Be the first one to write one.